In this tutorial I’ll share with you that how can you dynamically rename the column headers in Power Query. Once in a while you’ll run into situations where you’ll need dynamic headers (controlled by the user) in your data.
Let’s see how can we get this done!
Want to grab the video first?
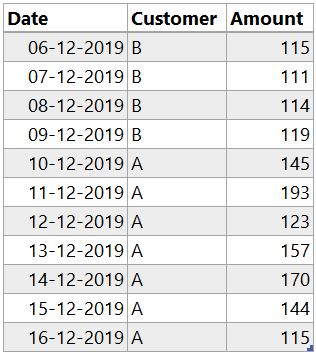
Consider this Simple Table..

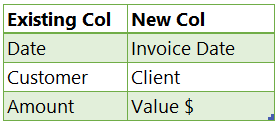
and the user should be able to rename the existing headers to new ones using this table

Let’s load both these tables to Power Query!
Renaming Column Headers
For the moment I am going to rename the columns manually by double clicking on the column headers and changing the names
- Date to Invoice Date
- Customer to Client
You’ll see that a new step “Renamed Columns” got inserted with the following code.

= Table.RenameColumns(#'Changed Type',{{'Date','Invoice Date'},{'Customer','Client'}})
If you carefully take a look at the code you’ll notice a few things
- The formula Table.RenameColumns accepts two inputs
- Table Name – Which should be considered for renaming columns. #”Changed Type”
- Column Names to be renamed and the Revised Names in the form of List of Lists in curly { } brackets – Each list should have 2 parts – Existing Column Name and the New Column Name {“Customer”,”Client”}
- Watch carefully each column renamed is a list (in curly brackets)
- And all the columns renamed form a single list – they all get surrounded by a curly bracket at the start and the end {{“Date”,”Invoice Date”},{“Customer”,”Client”}}
- The manually written column names is what we have to make dynamic.
If you don’t know what a list is – A list is a single columnar data and you’ll find it in curly brackets
Creating a Dynamic Column Name List
Now let’s go to the table which contains the headers (existing and new ones)

All is good but 2 problems
- As of now Existing Col and New Col are 2 separate column whereas I need a list (with a single column)
- This is a table, where as I need a list with sub-lists in it.
Let’s add a transpose step and I get this!

You can see that now I have 3 columns which contains 2 values {“existing column name”, “new column name”} but yet this is not a list so let’s make that!
In the Advanced Editor (View tab), let’s make a few changes to our query

and I have added one new line of M code (along with a few syntactical changes in yellow), which is row 5
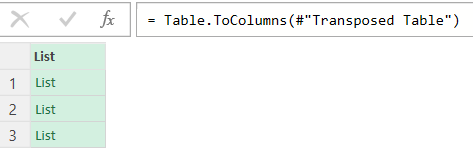
CreateList = Table.ToColumns(#'Transposed Table')
This code allows me to convert the table into a single list with sub list for each column, just as the way I wanted 🙂

Now let’s feed this Headers Query to Table.RenameColumns formula
Creating Dynamic Column Names
I’ll now simple plug the Headers into my Table.RenameColumn formula this way

- Headers – is nothing but the transformed query which contains a List of Existing and New Columns
- MissingField.Ignore – is the 3rd and optional input which allows me to skip the columns that I have not renamed without getting an error
That’s it and we are done! Now when the user inputs a new column name in the table, the query shall reflect the change!
CAUTION – Any further step after this step, that hard codes the column name in the formula will tank the query. So make sure that this is last step of the query.
DOWNLOAD THE EXCEL FILE WITH QUERY FROM BELOW
Similar Articles on Dynamic Column Renaming
- Imke’s Blog – BICCOUNTANT
- Ivan’s Blog – Using List.Zip Approach
- Ivan’s Blog Again – Using the same approach
More Interesting Stuff on Power Query
- Calculating Age in Power BI – PowerQuery and DAX Method
- Calculating Fiscal Year and Fiscal Month
- Writing IF, NestedIF AND / OR function in Power Query
- Download Power Query Tip Card
- Merge Data from Multiple Sheets into a Single Sheet
